

External hard drives and even USB sticks can present several problems that prevent the computer from identifying the devices. In the case of hard drives, the most common problems are caused by hard knocks and falls and are harder to fix, but in some cases, a wrong configuration or connection problems can explain the difficulty in accessing them.
Here are some steps you can take to try to rescue the drive, or at least identify and diagnose possible problems when it is not working properly. The tips apply to computers with Windows systems. It is worth noting that some tips are more technical, and it is recommended to call an expert if you do not have experience in the subject.
1. Check your disk management
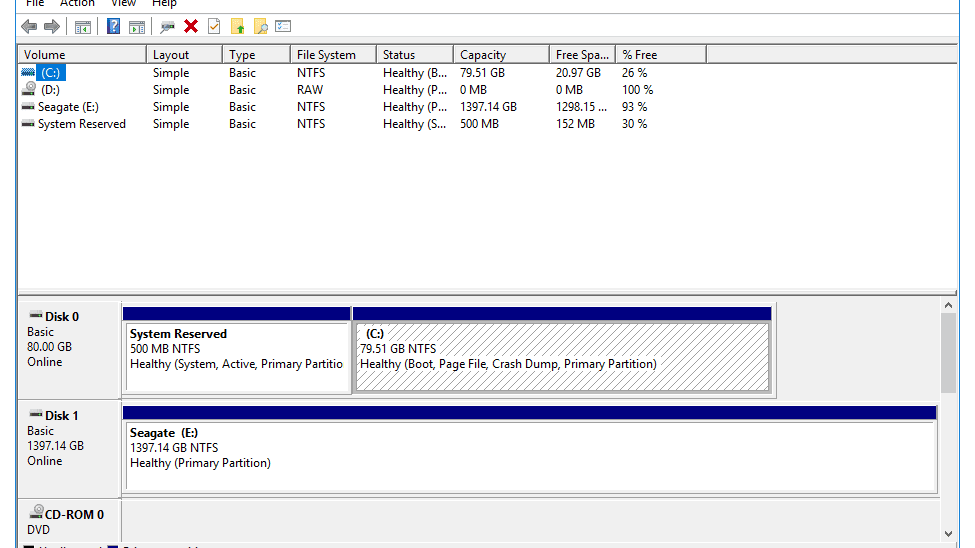
The first step you can take is to check if the external hard disk appears in your computer’s Disk Management tool. To access it, plug the disk or USB stick you want to test into a USB port, then right-click the Windows start button and choose “Disk Management”.
If the external hard drive is inaccessible in File Explorer but is found among the manager’s options, good news: the drive’s only problem may be the lack of a valid initialized partition, something you can fix with commands and options in the interface.
2. Test another USB port or computer
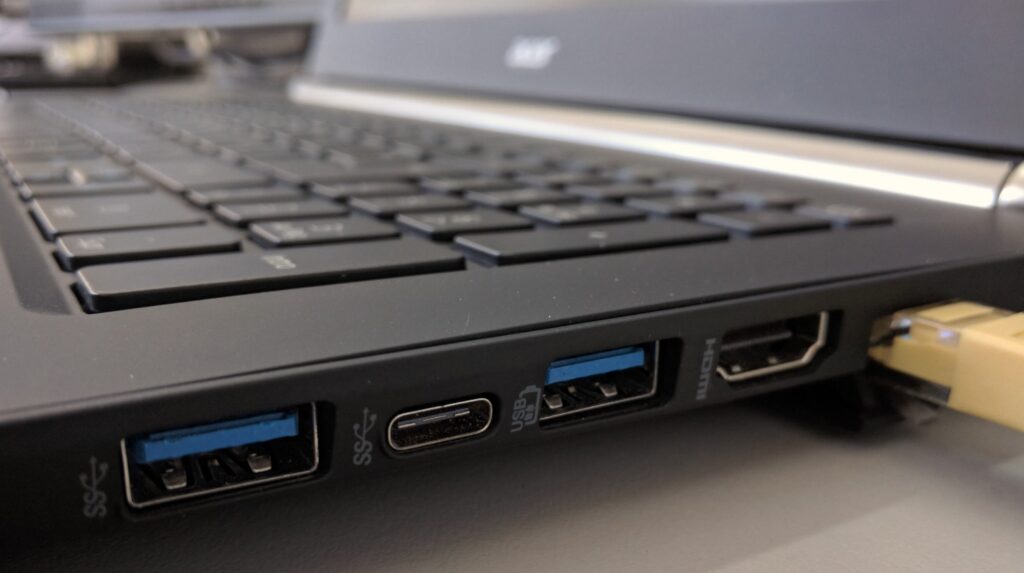
You can also test the drive on another USB port on your computer to try to find out if the problem preventing you from accessing it is interface-related, or even try viewing the drive with other devices, such as a second computer. A cell phone can be used if you have the necessary cables and adapters.
This is important because the problem may be related to the USB port. Another important tip is to try to avoid using USB hubs: these accessories do not offer enough power and may be the reason why your external disk is not being found by the computer.
3. Check for problems via Device Manager

The Windows Device Manager allows you to find and fix problems with components and accessories connected to your computer. To access the feature, right-click the start button and choose “Device Manager” from the list.
Here you can check whether Windows has found any malfunctions with the components related to the problem, such as controllers and USB ports, as well as disk drives. To check, expand the groups related to these elements and check the component properties. Any related error messages will be displayed there.
4. Attempt to format or create a new partition
If the hard drive is detected by Disk Management from the first topic in the list but does not appear in File Explorer, you can try to create a new volume and partition on the drive. If the problem is only logical, you will be able to access the drive, although all previously stored data will be lost.
To initialize a new volume and create partitions on the disk, simply find the correct drive in the list. Here it is important to be careful, as slips in these operations on internal disks can cause loss of your data.
Once you have found your hard drive or USB stick, right-click on the drive to choose the “New Simple Volume” option. Follow the options and wait until Windows completes formatting the drive to retry.
5. Cleaning and formatting the drive via Diskpart
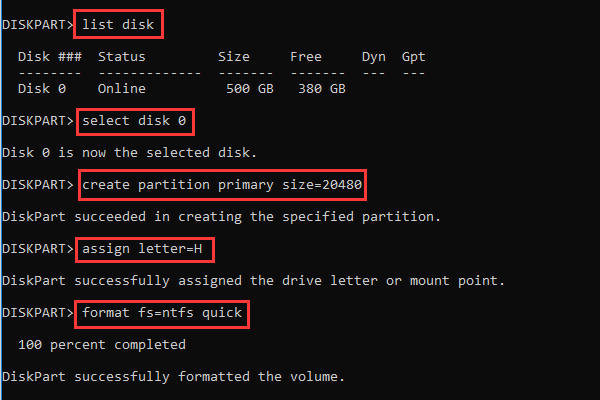
Diskpart is a powerful disk management tool from Microsoft that can fix various logical errors on your drives, including problems that are not evident in the native tools. There are a wide variety of commands that can be exploited by the tool, but in this case, you can start with the disk wiping command.
To test this, connect the failed drive to your computer via the USB port and run Diskpart through the Command Prompt as an administrator. With the service running, enter the command “diskpart” without quotes. Then type “list disk” (always without quotes) and check the output: you need to be sure that the external drive has been found to proceed. If so, write down the external hard drive number and use it in “select disk X” where “X” is the number designating the disk.
With the disk correctly selected, run the “clean” command to clean and hopefully rid your disk of any logical errors that make it inaccessible. As we pointed out earlier, Diskpart is a powerful tool packed with features and commands that allow you to format, create and edit partitions and fix several related problems. Therefore, it is important to be careful when using it.
Extra tip: Test with another drive in the same case
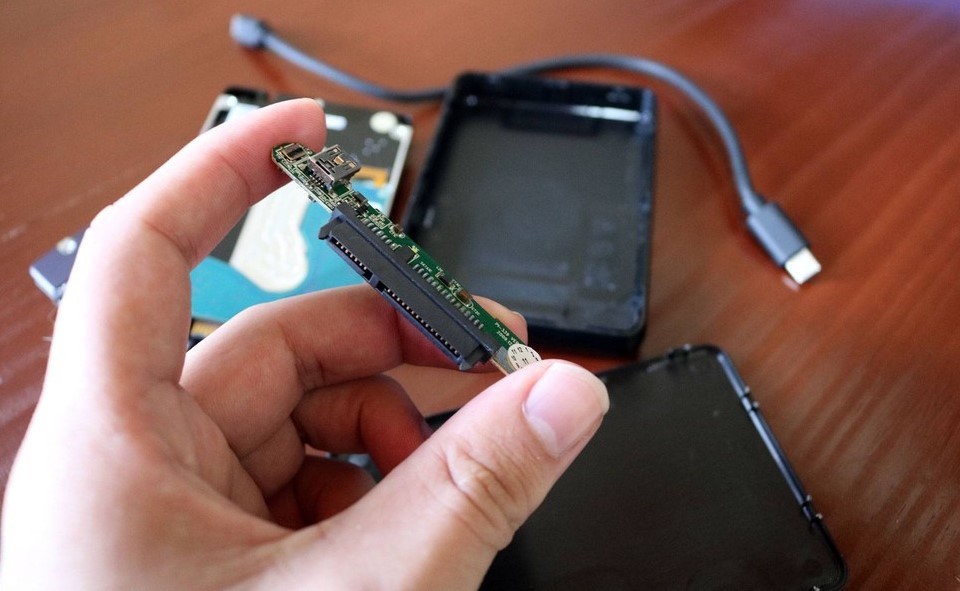
Any external hard drive consists of a regular hard drive inserted in a case with a SATA to USB adapter. This adapter may be defective, and one way to identify this possibility is to swap the connected disk. To do this you will need some manual electronic skills – some cases are not designed to be opened easily – and a spare hard drive to swap and test with. If you are not so confident in your ability to disassemble devices, you may want to consult a professional.
With the external hard drive open, just carefully remove the original hard drive and replace it with the reliable drive from our test. Connect the case card in this new drive to the SATA interface and connect the new drive to your computer to check if the adapter allows you to access it. If yes, the problem is in the original hard disk you removed. If not, the problem is the case itself.
This post may contain affiliate links, which means that I may receive a commission if you make a purchase using these links. As an Amazon Associate, I earn from qualifying purchases.